I thought I'd compile a few keyboard shortcuts that I use very often (or find it useful to know) when I scrap on PS (I'm using CS5 now).
For Mac, use Command or Option; for PC Windows, use Ctrl or Alt.
1. Zoom
Hold down Command/Ctrl + [Spacebar] + click and drag image left (zoom In) or right (zoom out).
I find it really convenient to zoom in and out like this but I think this is for CS5 only.
Alternatively, use Command/Ctrl + [+] to zoom in or + [-] to zoom out without using the mouse or pen. This works for CS3 at least and probably for older CS.
2. Draw Straight Lines
While moving the mouse/pen, hold down [Shift]. Works with nearly every drawing tool.
3. Move
Every time you are typing your journal or drawing in brush mode but need to move the object/text, it's always a hassle to switch the tool to the Move tool and then back again.
I do this: Hold down Command/Ctrl and click and drag to move the object. Release the key and it will switch back to the tool you were using.
4. Copy layer style
A shortcut for copying a layer style to another layer would be to hold down Option/Alt and drag the {fx} at the source layer to the target layer.
5. Hide Panels
Use the [Tab] key once to hide the panels and hit [Tab] again to unhide it.
6. Display
I'm not sure if this one works for versions other than CS5 because I accidentally discovered it.
Press [F] key to change the Screen mode. Keep pressing [F] to scroll through the modes.
7. Switch Foreground/Background Colours
Press [X] to quickly switch between the 2 selected colours.
8. Merge 2 layers
To merge a layer to the layer below, use Command/Ctrl + [E].
Note that {fx} style of the top layer will become part of the image/layer and cannot be modified anymore. However, the {fx} style of the lower level will be retained as a style and can be further modified.
9. Clipping photos to photomat
I use this the most: Command/Ctrl + [G] to clip my photo to a photomat.
However, I've personalised the [G] to [Q] because I find it easier to press Command with my thumb and [Q] with my ring-finger instead of pressing Command with my pinky finger and [G] with my middle finger.
p.s. Note that Command/Ctrl + [Q] is the default keyboard shortcut for quitting. Since I never use a keyboard shortcut to quit, it is not a big deal for me.
10. Transform
Another keyboard shortcut that I use all the time is Command/Ctrl + [T] which is to activate the transformation mode for various form of resizing.

Showing posts with label photoshop. Show all posts
Showing posts with label photoshop. Show all posts
Friday, June 17, 2011
Saturday, February 19, 2011
Fishing
“Give a man a fish; you have fed him for today. Teach a man to fish; and you will not have to listen to his incessant whining about how hungry he is.”
- Author unknown
I received 3 comments after posting the short tutorial on how to make warp shadows on Photoshop. All are anonymous, all are not very polite (as least that's how I felt when I read them), all were asking for the PSD file for their downloading.
Yes, I understand that if you use CS2 or below (and PSE?), you are not able to create a layer from the shadow effect. And hence, the tutorial is not very useful.
But can't you at least sign off your name (even if it is a fake one)?
So no, I am not putting the PSD file for downloading.
But I have a solution for those who are not using CS3 or above.
Steps:
1/ Duplicate the mat layer (the white one)
2/ Paint it grey (the shade of grey depends on the background colour of your layout)
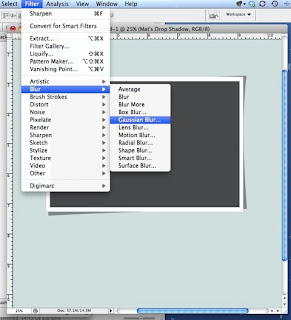
3/ Add filter to the layer -> Gaussian blur, Radius=2 pixel
4/ Warp this layer using Edit -> Transform -> Warp


So here I am, teaching you to fish, instead of handing you a fish for dinner tonight.
Then again, if you are one who can't be bothered to fish, then I propose that you look for a chicken or beef somewhere else.
Labels:
photoshop

Sunday, November 28, 2010
Skin smoothing on PS
I read and learnt a very useful technique yesterday.
It is for smoothing skin (especially for faces) in PS.
I have a Samsung camera which detects faces when focusing and auto-smooths them when I shoot. However, my iphone's camera application does not do that automatically.
I do have a few other applications that can do it but that will mean switching applications during photo-taking.
So I decide to do some googling and found a useful tutorial here.
If you are interested, read it up!
Here's my result.

Steps are very easy:-
1. duplicate a layer
2. create a quick-mask on the new layer and paint over the area you wish to smooth
3. go back to standard mode and feather selection (or feather the inverse)
4. add a filter of gussian blur (radius approximately 3 pixel) to the painted area
5. add a little bit of noise (2.5%) so that it is not overly smooth
Labels:
photoshop
Tuesday, September 14, 2010
Warp shadows
There may be many other ways to do this, but here's how I do it.
Of course I don't repeat the same steps whenever I create a template - I simply take a photo+mat set from an existing template and then resize, rotate etc for the new template.
Here's a simple illustration of my method.
1a. create a layer for photo and a layer for the mat (at least 105% of the photo depending on how thick you like the border to be)
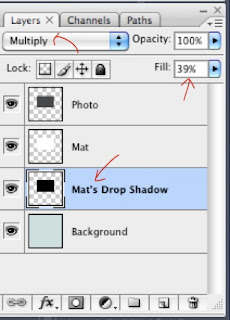
1b. add a drop shadow to the mat. Play with the distance and the size of the shadow.
- I use 10-18 for distance, 0 for spread and 4-6 for size (depends on size of the mat)
- For the "colour", I use "black" at 39% with "multiply" effect.
- Try to get a sharper shadow (you will blur it later).
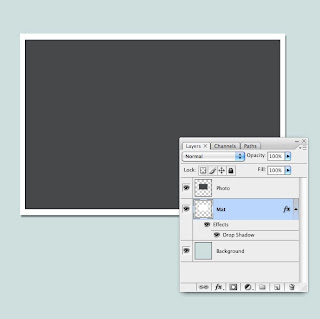
2. Create a layer for the shadow (right click on the "drop shadow" and select "create layer")
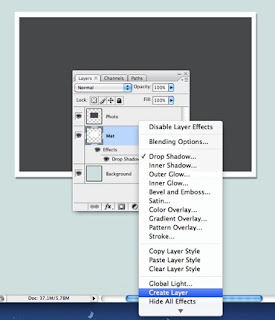
3. The new layer will have the characteristic of the settings you have chosen.
4. Select the shadow layer and use the warp function under Edit -> Transform -> Warp
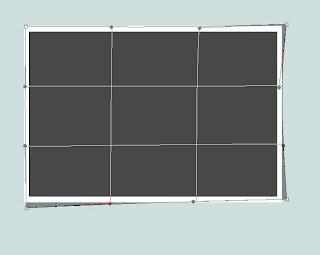
5. After warping, use "Gaussian blur" to unsharpen the shadow for a more realistic feel.
6. Merge Mat layer to Shadow layer and it's done!

It's not so difficult, isn't it?
Hope you'd find this useful and have fun trying it out!
Of course I don't repeat the same steps whenever I create a template - I simply take a photo+mat set from an existing template and then resize, rotate etc for the new template.
Here's a simple illustration of my method.
1a. create a layer for photo and a layer for the mat (at least 105% of the photo depending on how thick you like the border to be)
1b. add a drop shadow to the mat. Play with the distance and the size of the shadow.
- I use 10-18 for distance, 0 for spread and 4-6 for size (depends on size of the mat)
- For the "colour", I use "black" at 39% with "multiply" effect.
- Try to get a sharper shadow (you will blur it later).

2. Create a layer for the shadow (right click on the "drop shadow" and select "create layer")

3. The new layer will have the characteristic of the settings you have chosen.

4. Select the shadow layer and use the warp function under Edit -> Transform -> Warp

5. After warping, use "Gaussian blur" to unsharpen the shadow for a more realistic feel.

6. Merge Mat layer to Shadow layer and it's done!

It's not so difficult, isn't it?
Hope you'd find this useful and have fun trying it out!
Labels:
photoshop
Sunday, May 2, 2010


Wednesday, April 14, 2010
Sneak Peek at Photoshop CS5 Puppet Warp
This new function of CS5 is so amazing!
Imagine all the ribbons, strings, flowerstalks, leaves that we can warp easily with this new function!
Really really cool!!!
Imagine all the ribbons, strings, flowerstalks, leaves that we can warp easily with this new function!
Really really cool!!!
Labels:
photoshop
Tuesday, April 6, 2010
Photoshop fun
Well, I'm not an expert in Photoshop, but I enjoy learning the various tools of PS.
Today, I took a photo taken during a trip in Bali.
There was a stranger in the middle of the road and I snap the photo in a rush, without waiting for him to leave.
So, I decided to "remove" him now.
The result looks ok when the resolution is low, definitely not for printing nor looking @300%.
But I'm glad I had fun!
| Original | Now |
 |  |
Labels:
photoshop
Subscribe to:
Posts (Atom)